Difference between revisions of "SwagBadge2021 Status, blog and timeline"
| Line 1: | Line 1: | ||
| + | '''Status: Week of 2020-10-25''' | ||
| + | |||
| + | Now that we have all the Lolin32 microprocessors, we need to put a fresh copy of micropython on there (this means we know what version is on every badge, and that there's no malware on board). We also need to put our software on there (the Aiko framework and the Swagbadge code). It would be more efficient to do everything at once, but Jon and Andy agreed it would be sensible to pay a bit more time up front double-handling the ESP32s and flash micropython (MP) now, and then handle them all again later when the rest of the software is ready. | ||
| + | |||
| + | Why? | ||
| + | |||
| + | # This lets us test if the Lolins are functional, nice and early, when we have time to do something about it. | ||
| + | # It'll save us some time later on when we'll be hitting the deadline prior to shipping. | ||
| + | |||
| + | We need 300 badges. Jon allowed for a 10% failure rate. So we have 330. They take about 5 minutes each to flash. It's a big job! | ||
| + | |||
| + | So far Jon has flashed MP to 35 Lolins successfully, plus one failure. This is about 10% of the total number with only a single failure, so already it's paid dividends in giving us some confidence that the hardware is (mostly) good. But the failure is also really interesting! | ||
| + | |||
| + | This is a healthy Lolin: [[File:healthylolin.png|240px|Image of a healthy lolin with clean circuitry]] | ||
| + | |||
| + | This is the damaged one: [[File:unhealthylolin.png|240px|Image of a dodgy lolin with semi-repaired blobby circuitry]] | ||
| + | |||
| + | The bad one has been reworked at the factory, but unsuccessfully. You can see two solder bridges on the bottom pads. A solder bridge is where two components or circuits are joined together by solder, where they shouldn't be. A pad is the bit on the component used to connect the component to the board, via solder. | ||
| + | |||
| + | This is very interesting because it shows two things. First, they obviously do some form of quality control at the factory, otherwise they wouldn't have detected that this board needed rework in the first place. That's reassuring! Second, after the rework was done, it went in the "good" pile and was shipped to a customer, even though it still didn't work. That's bad! After taking the photo, Jon touched the bridges with a soldering iron (which removed the excess solder and "de-bridged" the circuit) and now the Lolin works fine. (They were ''so'' close to fixing it, but didn't quite get there. Strange.) Odd ones like these get set aside and kept as spares. They won't go into the general pool to go on a SwagBadge. | ||
| + | |||
'''Status: 2020-10-18''' | '''Status: 2020-10-18''' | ||
Revision as of 23:18, 19 October 2020
Status: Week of 2020-10-25
Now that we have all the Lolin32 microprocessors, we need to put a fresh copy of micropython on there (this means we know what version is on every badge, and that there's no malware on board). We also need to put our software on there (the Aiko framework and the Swagbadge code). It would be more efficient to do everything at once, but Jon and Andy agreed it would be sensible to pay a bit more time up front double-handling the ESP32s and flash micropython (MP) now, and then handle them all again later when the rest of the software is ready.
Why?
- This lets us test if the Lolins are functional, nice and early, when we have time to do something about it.
- It'll save us some time later on when we'll be hitting the deadline prior to shipping.
We need 300 badges. Jon allowed for a 10% failure rate. So we have 330. They take about 5 minutes each to flash. It's a big job!
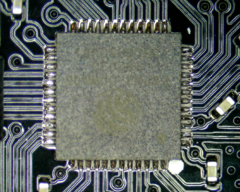
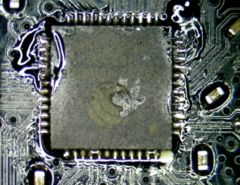
So far Jon has flashed MP to 35 Lolins successfully, plus one failure. This is about 10% of the total number with only a single failure, so already it's paid dividends in giving us some confidence that the hardware is (mostly) good. But the failure is also really interesting!
The bad one has been reworked at the factory, but unsuccessfully. You can see two solder bridges on the bottom pads. A solder bridge is where two components or circuits are joined together by solder, where they shouldn't be. A pad is the bit on the component used to connect the component to the board, via solder.
This is very interesting because it shows two things. First, they obviously do some form of quality control at the factory, otherwise they wouldn't have detected that this board needed rework in the first place. That's reassuring! Second, after the rework was done, it went in the "good" pile and was shipped to a customer, even though it still didn't work. That's bad! After taking the photo, Jon touched the bridges with a soldering iron (which removed the excess solder and "de-bridged" the circuit) and now the Lolin works fine. (They were so close to fixing it, but didn't quite get there. Strange.) Odd ones like these get set aside and kept as spares. They won't go into the general pool to go on a SwagBadge.
Status: 2020-10-18
2048 grams of OLEDs arrived. The PCBs are being fabricated, their soldermask is going on and we expect they'll be finished construction by the time this post goes to air, and will hopefully be sent to shipping early next week.
Since we sent the PCBs to the factory to be made, we've learned more about capacitive touch components and realise that we could have done a better job with what's on the board. It turns out it takes more than a week to learn everything there is to know about a new kind of component! Nonetheless, what we have provided will still work just great for plenty of purposes.
Because technology doesn't operate in a culture-free vacuum, we had a chat amongst the team about where we chose to have the PCBs fabricated. The factory of choice this time was JLC which we've used before. Here's a tour of their factory! Jon and Andy have visited it and others like it in person a few years ago, lucky enough to have attended a maker's tour of factories in Shenzhen. There's a series of videos on the tour to get a taste of what they saw.
Think building your own PCB is too hard? Think again! If you plan on building a custom SAO you'll want to learn how. The internet provides once again, with a video on how to build your own, but we plan to gather up some good resources as part of building out the Swagbadge so you can refer back to it in the future.
On the software front, we've been fixing bugs in the framework, discussing security around how people can get two or more badges communicating (or just an MQTT client talking to a badge), and our hopes and dreams for getting software and hardware interoperating in a modular way, thereby reducing the barriers that would otherwise stop people having fun with it.
Status: 2020-10-11
Phew! The OLED screens are enroute as are the Lolin ESP32 microprocessors. The Chinese national holiday added a delay that had us all nervously refreshing the shipment tracking page. The PCB design is being finalised today and we expect to send that order off tomorrow. We hope this will give us a narrow window for a second run if they come back faulty in some way and still meet our overall shipping deadline.
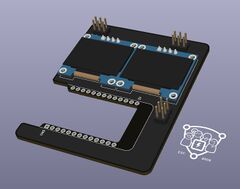
This week has mostly been about making sure we had the design and components and layout on the PCB solid to meet our goals of something that would
- be useful right at the start without any additional components
- be elegant to look at
- function as a badge
- have the SAO extension points are in useful locations and pointing in useful directions.
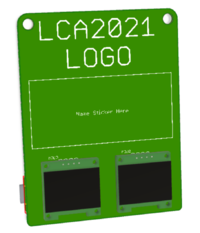
- have space to include the important logos for the conference!
If you'd like to hear more about the PCB design, one of our team, the delightful Jon Oxer, runs a livestream most Sunday mornings. His latest episode talks about the swagbadge from about 34 minutes in.
On the software front, we're starting to think about what we want the badge to support from the moment you switch it on. (Including how you'll be able to configure it for your network). In coming weeks we'll talk about how you, our community, can get involved in the software side as well as the hardware side.
Status: 2020-10-04
Project approved and announced ... #swagbadge hardware design underway ... #swagbadge major parts ordered ... #dagbadge BoM not yet finalized ... Core team (mostly) assembled and ready to start building the community ... SAO hardware community development not yet commenced (but ideas are brewing) ... #swagbadge firmware development is still flying under-the-radar !
Note: Whilst the #swagbadge major parts have been ordered (330x ESP32 microcontrollers and 660x OLED screens), we are already sweating on shipping delays !
Recommendations for those who can't wait to get started
- Play with microPython on-line: Select peripheral "I2C LCD", choose demo "I2C LCD" and press "Run script"
- Play with microPython on Unix: See section "The Unix version"
- Read up on SAO hardware add-ons: How to extend the #swagbadge using a 6 pin (2x3) connector with power, I2C bus and 2x GPIO pins
Blog and timeline
- 2020-10-04: #swagbadge project public announcement
- 2020-09-24: Preparing for initial public announcement
- 2020-09-17: GitHub repository: #swagbadge hardware created
- 2020-09-11: Assembling core OHMC team ... getting the band back together
- 2020-09-10: #swagbadge project green light ... we're good to go ! Trying not to spill the beans ?
- 2020-09-07: #swagbadge project proposal (goals, timeline and costs) sent to LCA2021
- 2020-08-26: #swagbadge project conception
- 2020-05-06: LCA2021 in Canberra "postponed" to 2022 and rebooted as on-line and world-wide for 2021 ... finally made it to Antarctica !
- 2018-01-22: LCA2021 GitHub repository: Aiko Engine for microPython incept date
